Void Linux root on an encrypted ZFS mirror with syslinux MBR and ZFSBootMenu
Published on 2022-10-23. Modified on 2022-10-25.
In this tutorial I am going to use Void Linux to "replicate" how FreeBSD is utilizing ZFS snapshots for boot environments. I am going to use a MBR based setup with a native ZFS encrypted root mirror. With a ZFS root mirror we not only get the benefits of ZFS snapshots, but we also get the benefits of ZFS' ability to auto repair any corrupted data (from things like bit rot). And in case one of the hard drives fail, we can quickly replace the broken disk with a new disk and have everything up and running again in a very short time.
Table of Contents
- Introduction
- The setup
- Overview of the Boot Process
- Install media
- Using a virtual machine for testing
- Let's do the install
- Taking snapshots for ZFSBootMenu
- Using snapshots with ZFSBootMenu
- Replacing a broken disk
- Relevant resources
Introduction
I absolutely love the level of engineering that goes into both OpenBSD and FreeBSD. On FreeBSD the ZFS filesystem is tightly integrated into the core of the system and the boot loader fully supports boot environments. With boot environments you can utilize the snapshot capabilities of ZFS and use a snapshot to boot from. Not only that, but the FreeBSD update procedure automatically takes a snapshot before a base system upgrade, making sure that in case something breaks the system, you can simply boot from a previously working snapshot and then fix the problem.
The level of integration of ZFS into FreeBSD is fantastic. A big shout-out to Allan Jude from Klara Inc. for his great work in this area. Allans many years of experience running ZFS on FreeBSD based servers in many data centers across the globe has benefited the FreeBSD community greatly :) Also a big shout-out to all the other developers of both FreeBSD and OpenZFS!
The lack of proper support for ZFS on most Linux distributions is a real shame. As I have mentioned in my Battle testing ZFS, Btrfs and mdadm+dm-integrity article, ZFS is light years ahead of Btrfs. The two filesystems cannot even compare. A ton of work has gone into OpenZFS from the Linux developers and ZFS deserves to the treated as a first-class citizen on Linux. Yes, I know about the "so-called" license issue, but that has been blown completely our of proportions. Most Linux distributions don't even provide ZFS despite the fact that there is absolutely no reason not to.
On Arch Linux you can't even get ZFS from the official repositories! Rather you have to use either an AUR package or a non-official repository, which occasionally breaks ZFS on your system because a kernel update might arrive before a relevant fix to the ZFS DKMS module.
Still, the Arch Linux developers have no problems with the buttload of non-free software packages they provide in their official repositories, like rar/unrar with its "custom" license.
Despite the amazing user contributed documentation on the ZFS section on the Arch Linux wiki, ZFS still gets treated like a "second-class citizen" by the Arch Linux developers.
TIP! Besides from all the Technical reasons to choose FreeBSD over GNU/Linux, if you want proper support for ZFS, run FreeBSD! FreeBSD treats ZFS as a true first-class citizen and no Linux distribution can compare in that regard. FreeBSD has tightly integrated ZFS into several of the system base tools. Even the top command displays ZFS ARC Stats.
With all that said, not all Linux distributions ignores ZFS. Ubuntu has good support for ZFS. As do Debian and Devuan (by enabling the "contrib" section in the APT source list - I recommend using the "backports" to get the newer version). Likewise Alpine Linux, with their "extended" release, which contains the ZFS kernel module.
Artix Linux, that originally was based upon Arch Linux, but without systemd, is now a great independent distribution that also provides support for ZFS with their "universe" repository. However, the "universe" repository is maintained by individual Artix package maintainers and though it contains some programs which are not provided in the 4 main repositories, like ZFS, it's not as up to date as the regular repositories. As of writing the ZFS package is outdated compared to the non-official archzfs repository, which you'll need anyway if you're trying to build an Artix Linux ISO with ZFS, or install Artix Linux on a ZFS root.
However, one of my absolute favorite Linux distributions, is Void Linux. Void Linux provides great support for ZFS with the zfs package in their main repository, which provides the ZFS userland, pyzfs, the kernel module (using DKMS) and debug files. The package is regularly updated and ZFSBootMenu is also a first-class citizen.
In this tutorial I am going to show you how you can install Void Linux root on a ZFS natively encrypted mirror coupled with the ZFSBootMenu tool, which provides an easy way to handle boot environments using ZFS snapshots, almost like on FreeBSD.
The setup
I am going to use Master Boot Record (MBR) and the syslinux boot loader. I am old-school in that regard and often actually prefer MBR to UEFI because it just always works even if you have to move the disks to another motherboard. I have found myself in several situations in which UEFI was implemented different across motherboard vendors, causing UEFI stuff to break if you move disks across machines. Feel free to choose your "pain" :) You can make this setup work the same using UEFI and the rEFInd boot manager.
Because the Void Linux install script is a simple script, it doesn't support a ZFS root installation, so it is necessary to make the installation manually via chroot. That is not different from any other advanced installation, in fact installing manually via chroot is the default way you install Arch Linux, so don't let that demotivate you. Installing Linux via the chroot method has some advantages too, one of them is that you get a much better understanding for how your system is setup.
I am going to use ZFSBootMenu, which has great support for Void Linux. ZFSBootMenu is a bootloader designed from the ground up to support booting Linux distributions directly from a ZFS pool. The main advantage is that ZFSBootMenu provides an experience similar to the FreeBSD bootloader. ZFSBootMenu takes advantage of ZFS features, providing multiple boot environments, such as using different ZFS snapshots for booting. You can even bootstrap a system installation via zfs receive. ZFSBootMenu integrates with native ZFS encryption, intelligently managing encryption keys for boot environments.
Because we're running a ZFS mirror, we need to setup two identical disks making each drive bootable on its own. We need this in case one of the drives fail such that we can:
- Physically remove the defective drive.
- Attach a new drive that is going to replace the defective drive.
- Boot from the remaining working drive that is part of the original ZFS mirror.
- Clone the disk partition scheme from the working drive to the new drive.
- Clone the boot partition.
- Install the MBR to the new disk.
- Use ZFS to replace the old defective (now missing) ZFS partition with the new partition on the new disk.
- ZFS will resilver (ZFS jargon for restoring) the mirror.
- We're back in business.
Overview of the Boot Process with syslinux and ZFSBootMenu
- syslinux boots a stock Linux kernel along with an initramfs image that contains the ZFSBootMenu dracut module.
- ZFSBootMenu loads and presents a boot menu.
- ZFSBootMenu imports all importable ZFS pools.
- ZFSBootMenu identifies a default boot environment.
- If ZFSBootMenu was started with a
zbm.prefer=<pool>argument, the default boot environment will be that specified by thebootfsproperty on the specified pool. - If no preferred pool was identified, ZFSBootMenu will look for the first identified pool with a
bootfsproperty to determine the default boot environment.
- If ZFSBootMenu was started with a
- If a default boot environment was identified, present a countdown timer for automatic boot.
- If no default environment can be found or the countdown is interrupted, ZFSBootMenu provides an interactive boot menu.
- ZFSBootMenu identifies all potential boot environments as filesystems that mount to
/or have alegacymountpoint with an opt-in property set. - ZFSBootMenu enumerates kernels and initramfs images in the
/bootsubdirectory of each environment. - ZFSBootMenu allows the selection of a desired kernel within any boot environment.
- ZFSBootMenu identifies all potential boot environments as filesystems that mount to
- After a boot environment is selected for boot (automatically or manually), ZFSBootMenu loads the selected kernel and initramfs, unmounts all ZFS filesystems, and boots the system.
At this point, we're booting into our operating system managed kernel and initramfs, along with any arguments needed to correctly boot our system.
Install media
We need a Void Linux installation medium with ZFS drivers.
Option 1 - mklive.sh
One option is to build a custom Void Linux image from the official void-mklive repository by providing the command-line option -p zfs to the mklive.sh script. This is my preferred way as it enables us to customize the install media as we see fit.
In this example I am creating a custom Void Linux install ISO with a Danish keyboard layout, a custom bootloader title, and some additional tools. I also enable the dhcpcd service in order to get an IP address via DHCP.
The mklive.sh script must be run as root on an already working Void Linux installation. You can use a virtual machine to install Void Linux if you haven't got a working Void Linux up and running.
Then do (change the options to suit your needs):
$ git clone https://github.com/void-linux/void-mklive
$ make
$ su -
# ./mklive.sh -k dk -T "Void Linux with ZFS" -p "zfs neovim mc gptfdisk lynx smartmontools" -S "dhcpcd"
It takes a couple of minutes on an old Intel i5-4570S running Void Linux in QEMU, resulting in an ISO at about 299M (with the packages I have selected).
Put the ISO unto an USB stick with dd (change the name of the ISO file to match yours and change the device name for your USB stick):
# dd if=void-live-x86_64-5.19.16_1-20221021.iso of=/dev/sdX bs=4M oflag=direct status=progress
Option 2 - USB to USB
Another option is to download one of the Void Linux install media ISO files, put it unto an USB stick and use that to install Void Linux unto another USB stick. Boot of the second USB stick and treat it like a normal Void Linux installation, i.e. install the packages you need, such as the zfs package, etc. You can then use the second USB stick to boot from and install Void Linux unto the physical hard drives.
Option 3 - hrmpf image
You can also fetch a pre-built hrmpf image. These images are maintained by a Void team member and they are an extension to the standard Void Linux live images that include pre-compiled ZFS modules in addition to some other useful tools.
Using a virtual machine for testing
You can test this setup out on a virtual machine. With QEMU you can create two identical images that will function as two identical hard drives. In this example I am creating to 50GB virtual disks:
$ qemu-img create -f qcow2 void-1.img 50G
$ qemu-img create -f qcow2 void-2.img 50G
Then run QEMU and make it possible to log in using SSH from a regular terminal by enabling sshd and redirecting to port 5555:
$ qemu-system-x86_64 -enable-kvm -machine q35 -device intel-iommu -cpu host -smp 4 -m 8192 -drive file=void-1.img,if=virtio,cache=none -drive file=void-2.img,if=virtio,cache=none -device e1000,netdev=net0 -netdev user,id=net0,hostfwd=tcp::5555-:22 -cdrom void-live-x86_64-5.19.16_1-20221021.iso -boot d
Take a look at the QEMU documentation for detailed explanation of the different options.
Once you have booted the Void Linux install ISO in QEMU, login as root and enable the sshd service with:
# ln -s /etc/sv/sshd /var/service/
You can then login from a regular terminal, if you prefer that to working in the QEMU window (I know I do), with:
$ ssh localhost -p 5555 -l anon (password is voidlinux)
Let's do the install
Whether you're using QEMU, some other virtual machine, or real physical hardware, let's get on with installation and setup!
I'll assume that you have booted from a working Void Linux install media with a working ZFS kernel module and that you have attached two identical hard drives to your physical or virtual machine.
I am using a physical machine with two spinning hard drives for this tutorial.
-
Login as
rootwith the passwordvoidlinux, or usesuto become root if you have already logged in as theanonuser.If you prefer Bash for the root account, you can change the shell to that before you begin:
# bash
-
Verify your IP address with the command:
# ip a
And try to ping something:
# ping voidlinux.org
-
Generate
/etc/hostid:# zgenhostid
-
Store your pool passphrase in a key file:
WARNING! You need to make sure that the passphrase is at least 8 characters long. Also, make sure that the passphrase is something that you can type on your keyboard, you will need to type it in order to unlock the ZFS pool on boot.
# echo 'MySecretPassword' > /etc/zfs/zroot.key
# chmod 000 /etc/zfs/zroot.key
Change "MySecretPassword" to a passphrase of your choosing :)
-
Locate your hard drives:
# fdisk -l
For this tutorial I am using two (old and previously used) identical 500 GB Seagate spinning drives, so I see the following:
Disk /dev/sda: 465.76 GiB, 500107862016 bytes, 976773168 sectors
Disk model: ST3500413AS
Units: sectors of 1 * 512 = 512 bytes
Sector size (logical/physical): 512 bytes / 512 bytes
I/O size (minimum/optimal): 512 bytes / 512 bytes
Disklabel type: gpt
Disk identifier: 241C6498-F094-154F-AC99-5795D09B31D8

Disk /dev/sdb: 465.76 GiB, 500107862016 bytes, 976773168 sectors
Disk model: ST3500418AS
Units: sectors of 1 * 512 = 512 bytes
Sector size (logical/physical): 512 bytes / 512 bytes
I/O size (minimum/optimal): 512 bytes / 512 bytes
Disklabel type: dos
Disk identifier: 0xf97b1ccc
-
Create a new partition scheme on both disks.
I am using
fdiskhere:# fdisk /dev/sda Welcome to fdisk (util-linux 2.38.1). Changes will remain in memory only, until you decide to write them. Be careful before using the write command. Command (m for help): o Created a new DOS disklabel with disk identifier 0x1ff52c1a. Command (m for help): n Partition type p primary (0 primary, 0 extended, 4 free) e extended (container for logical partitions) Select (default p): p Partition number (1-4, default 1): First sector (2048-976773167, default 2048): Last sector, +/-sectors or +/-size{K,M,G,T,P} (2048-976773167, default 976773167): +512M Created a new partition 1 of type 'Linux' and of size 512 MiB. Command (m for help): n Partition type p primary (1 primary, 0 extended, 3 free) e extended (container for logical partitions) Select (default p): p Partition number (2-4, default 2): First sector (1050624-976773167, default 1050624): Last sector, +/-sectors or +/-size{K,M,G,T,P} (1050624-976773167, default 976773167): Created a new partition 2 of type 'Linux' and of size 465.3 GiB. Command (m for help): t Partition number (1,2, default 2): Hex code or alias (type L to list all): bf Changed type of partition 'Linux' to 'Solaris'. Command (m for help): a Partition number (1,2, default 2): 1 The bootable flag on partition 1 is enabled now. Command (m for help): w The partition table has been altered. Calling ioctl() to re-read partition table. Syncing disks.Then repeat the steps for the second drive, in my case
/dev/sdb.We now have two identically partitioned drives:
# fdisk -l
Disk /dev/sda: 465.76 GiB, 500107862016 bytes, 976773168 sectors
Disk model: ST3500413AS
Units: sectors of 1 * 512 = 512 bytes
Sector size (logical/physical): 512 bytes / 512 bytes
I/O size (minimum/optimal): 512 bytes / 512 bytes
Disklabel type: dos
Disk identifier: 0x1ff52c1a

Device     Boot   Start       End   Sectors   Size Id Type
/dev/sda1  *       2048   1050623   1048576   512M 83 Linux
/dev/sda2       1050624 976773167 975722544 465.3G bf Solaris

Disk /dev/sdb: 465.76 GiB, 500107862016 bytes, 976773168 sectors
Disk model: ST3500418AS
Units: sectors of 1 * 512 = 512 bytes
Sector size (logical/physical): 512 bytes / 512 bytes
I/O size (minimum/optimal): 512 bytes / 512 bytes
Disklabel type: dos
Disk identifier: 0x49149b93

Device     Boot   Start       End   Sectors   Size Id Type
/dev/sdb1  *       2048   1050623   1048576   512M 83 Linux
/dev/sdb2       1050624 976773167 975722544 465.3G bf Solaris
-
Identify the hard drives partition IDs (I have shortened the output here):
# ls -l /dev/disk/by-id/
ata-ST3500413AS_Z2AN282G -> ../../sdb
ata-ST3500413AS_Z2AN282G-part1 -> ../../sdb1
ata-ST3500413AS_Z2AN282G-part2 -> ../../sdb2
ata-ST3500418AS_9VMT3B5Q -> ../../sda
ata-ST3500418AS_9VMT3B5Q-part1 -> ../../sda1
ata-ST3500418AS_9VMT3B5Q-part2 -> ../../sda2
In my case, the two relevant IDs are
ata-ST3500413AS_Z2AN282G-part2andata-ST3500418AS_9VMT3B5Q-part2, pointing tosdb2andsda2(which I have colored green in the above). -
Create the zpool using the partition IDs:
# zpool create zroot mirror -f -o ashift=12 -O compression=lz4 -O acltype=posixacl -O xattr=sa -O relatime=on -O encryption=aes-256-gcm -O keylocation=file:///etc/zfs/zroot.key -O keyformat=passphrase -m none ata-ST3500413AS_Z2AN282G-part2 ata-ST3500418AS_9VMT3B5Q-part2
If you're using SSDs, you can consider using the
-o autotrim=onoption as well.NOTE! TRIM allows the SSD to erase unused cells in the background so that the SSD does not have to erase the cell later when it has to write, thus speeding up the write process.
Most recent SSDs have their own internal garbage collection process that does this very effectively, so TRIM isn't necessary to maintain write performance anymore.
Without enabling TRIM (either periodic TRIM or continues TRIM) garbage collection can become write-amplified in the edge case where your hard drive is almost full. This problem can be mostly mitigated by over-provisioning the SSD's unused space (leave about 20% of the drive free).
Please see TRIM for further information.Take a look at the Void Linux man pages for a full documentation of the properties of ZFS storage pools and ZFS pool features for a full description of the available options.
TIP! Take a look at my follow-up Understanding Unix Filesystem Timestamps for a bit more information about
atime,relatimeand their settings. -
Let's check our pool status:
# zpool status pool: zroot state: ONLINE config: NAME STATE READ WRITE CKSUM zroot ONLINE 0 0 0 mirror-0 ONLINE 0 0 0 ata-ST3500413AS_Z2AN282G-part2 ONLINE 0 0 0 ata-ST3500418AS_9VMT3B5Q-part2 ONLINE 0 0 0 errors: No known data errors -
Now its time to create our initial datasets (or file systems):
# zfs create -o mountpoint=none zroot/ROOT
# zfs create -o mountpoint=/ -o canmount=noauto zroot/ROOT/void
# zfs create -o mountpoint=/home zroot/home
NOTE! It is important we set the property
canmount=noautoon any file systems withmountpoint=/(that is, on any additional boot environments we create). Without this property, Void Linux will attempt to automount all ZFS file systems and fail when multiple file systems attempt to mount at/. This will prevent our system from booting. Automatic mounting of/is not required because the root file system is explicitly mounted in the boot process.
Unlike many ZFS properties,canmountis not inheritable. Therefore, settingcanmount=noautoonzroot/ROOTis not sufficient, as any subsequent boot environments we create will default tocanmount=on. It is necessary to explicitly set thecanmount=noautoon every boot environment we create. -
Export the pool, then re-import with a temporary mountpoint:
# zpool export zroot
# zpool import -N -R /mnt zroot
# zfs load-key -L prompt zroot
Enter passphrase for 'zroot':

# zfs mount zroot/ROOT/void
# zfs mount zroot/home
The passphrase is the "MySecretPassword" which you put into the
zroot.keyfile. -
Verify that everything is mounted correctly:
# mount | grep mnt
zroot/ROOT/void on /mnt type zfs (rw,relatime,xattr,posixacl)
zroot/home on /mnt/home type zfs (rw,relatime,xattr,posixacl)
-
Time to install Void Linux.
Adjust the mirror and package selection as you see fit.
# XBPS_ARCH=x86_64 xbps-install -S -R https://mirrors.dotsrc.org/voidlinux/current -r /mnt base-system zfs neovim efibootmgr gptfdisk
-
Copy relevant files into the new installation:
# cp /etc/hostid /mnt/etc/
# cp /etc/resolv.conf /mnt/etc/
# cp /etc/zfs/zroot.key /mnt/etc/zfs
-
Mount
proc,sys, etc., and chroot into the new installation:# mount -t proc proc /mnt/proc # mount -t sysfs sys /mnt/sys # mount -B /dev /mnt/dev # mount -t devpts pts /mnt/dev/pts # chroot /mnt /bin/bash
-
Set the keymap, timezone, hardware clock and glibc locale (adjust to your needs):
# echo 'KEYMAP="dk"' >> /etc/rc.conf
# echo 'TIMEZONE="Europe/Copenhagen"' >> /etc/rc.conf
# echo 'HARDWARECLOCK="UTC"' >> /etc/rc.conf
# echo 'en_US.UTF-8 UTF-8' >> /etc/default/libc-locales
-
Reconfigure glibc locale
# xbps-reconfigure -f glibc-locales
-
Set a root password:
# passwd
-
Now we get to the ZFS Configuration.
ZFS can more quickly discover and import pools on boot if we use a pool cachefile:
# zpool set cachefile=/etc/zfs/zpool.cache zroot
-
Let's configure our default boot environment:
# zpool set bootfs=zroot/ROOT/void zroot
-
Then we need to configure Dracut to load ZFS:
WARNING! Please note the spaces between the double quotes and their values in the
add_dracutmodules,omir_dracutmodulesandinstall_itemsoptions. They need to be there, it's not a typo!# echo 'nofsck="yes"' >> /etc/dracut.conf.d/zol.conf # echo 'add_dracutmodules+=" zfs "' >> /etc/dracut.conf.d/zol.conf # echo 'omit_dracutmodules+=" btrfs "' >> /etc/dracut.conf.d/zol.conf # echo 'install_items+=" /etc/zfs/zroot.key "' >> /etc/dracut.conf.d/zol.conf
Let's rebuild initramfs and make sure that all installed packages are configured properly:
# xbps-reconfigure -fa
Now we configure ZFSBootMenu:
# zfs set org.zfsbootmenu:commandline="ro quiet" zroot/ROOT
-
Then we create an ext4 filesystem on the boot partition of one of the disks (we fix the second disk in a moment). In my case I use
sda1:# mkfs.ext4 -O '^64bit' /dev/sda1 # mkdir /boot/syslinux # mount /dev/sda1 /boot/syslinux
The "64bit" option of ext4 enables the file system to be larger than 2^32 blocks, we don't need that so we disable this with the
^(not) mark. -
Then we need to install syslinux, copy the modules and install extlinux:
# xbps-install -S syslinux
# cp /usr/lib/syslinux/*.c32 /boot/syslinux
# extlinux --install /boot/syslinux
/boot/syslinux is device /dev/sda1
-
We also need to install the syslinux MBR data:
# dd bs=440 count=1 conv=notrunc if=/usr/lib/syslinux/mbr.bin of=/dev/sda
1+0 records in
1+0 records out
440 bytes copied, 0.000276543 s, 1.6 MB/s
-
Let's install the ZFSBootMenu package:
# xbps-install -S zfsbootmenu
-
Then we enable the ZFSBootMenu image creation.
Edit
/etc/zfsbootmenu/config.yamland set:- Under the
Globalsection, setManageImages: trueandBootMountPoint: /boot/syslinux - Under the
Componentssection, setImageDir: /boot/syslinux/zfsbootmenuandVersions: 3andEnabled: true - Under the
Components.syslinuxsubsection, setEnabled: true
This result (as of writing - the configuration file may change layout in the future) is this:
Global: ManageImages: true BootMountPoint: /boot/syslinux DracutConfDir: /etc/zfsbootmenu/dracut.conf.d PreHooksDir: /etc/zfsbootmenu/generate-zbm.pre.d PostHooksDir: /etc/zfsbootmenu/generate-zbm.post.d InitCPIO: false InitCPIOConfig: /etc/zfsbootmenu/mkinitcpio.conf Components: ImageDir: /boot/syslinux/zfsbootmenu Versions: 3 Enabled: true syslinux: Config: /boot/syslinux/syslinux.cfg Enabled: true EFI: ImageDir: /boot/efi/EFI/void Versions: false Enabled: false Kernel: CommandLine: ro quiet loglevel=0 - Under the
-
Then generate the initial bootmenu initramfs:
# xbps-reconfigure -f zfsbootmenu
zfsbootmenu: configuring ...
Creating ZFSBootMenu 2.0.0 from kernel /boot/vmlinuz-5.19.16_1
Created initramfs image /boot/syslinux/zfsbootmenu/initramfs-2.0.0_1.img
Created kernel image /boot/syslinux/zfsbootmenu/vmlinuz-2.0.0_1
zfsbootmenu: configured successfully.
-
Now we need to deal with the second hard drive.
Clone the partition of
sda1tosdb1:# dd if=/dev/sda1 of=/dev/sdb1 bs=1M 512+0 records in 512+0 records out 536870912 bytes (537 MB, 512 MiB) copied, 8.77931 s, 61.2 MB/s
-
Install the syslinux MBR data on the second drive:
# dd bs=440 count=1 conv=notrunc if=/usr/lib/syslinux/mbr.bin of=/dev/sdb
1+0 records in
1+0 records out
440 bytes copied, 0.00529884 s, 83.0 kB/s
-
Exit the chroot, unmount everything, export the zpool and reboot.
# exit
# umount -n /mnt/{dev/pts,dev,sys,proc}
# umount /mnt/boot/syslinux
# zpool export zroot
# reboot
This way we can boot of either disk and we don't need anything in /etc/fstab.
We're done with the installation!
Taking snapshots for ZFSBootMenu
The dataset you need to snapshot is /zroot/ROOT/void
Currently we don't have any snapshots:
# zfs list -t all
NAME              USED  AVAIL     REFER  MOUNTPOINT
zroot            1.72G   448G      192K  none
zroot/ROOT       1.72G   448G      192K  none
zroot/ROOT/void  1.72G   448G     1.72G  /
zroot/home        216K   448G      216K  /home
Let's take a snapshot. I like to use the current date and time:
# zfs snapshot zroot/ROOT/void@$(date +%Y-%m-%d-%H%M)
Let's take a look:
# zfs list -t all
NAME                              USED  AVAIL     REFER  MOUNTPOINT
zroot                            1.72G   448G      192K  none
zroot/ROOT                       1.72G   448G      192K  none
zroot/ROOT/void                  1.72G   448G     1.72G  /
zroot/ROOT/void@2022-10-20-2154     0B      -     1.72G  -
zroot/home                        216K   448G      216K  /home
Now when we boot, we can choose that snapshot as a boot environment. ZFSBootMenu will then use that snapshot to create a clone, and it will boot of of that.
Each time, before you fiddle with the system or do an upgrade of any of your packages, you can take a snapshot and then always revert the changes by booting from that snapshot and making it the default boot environment.
When you boot from ZFSBootMenu, you get the option to press the Escape key for a boot menu. You then enter your passphrase to decrypt the ZFS pool and you get a second menu with multiple options, essentially going back in time and reverting the changes.
You can also use this to test out new setups, you don't need to be afraid of messing up your system as you can always revert any changes you've made. You can even revert the famous # rm -rf / command!
Using snapshots with ZFSBootMenu
When we boot into the ZFSBootMenu, we get a screen that looks like this:
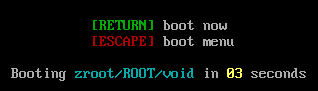
Once you have pressed the Escape key you get a boot menu with several options:
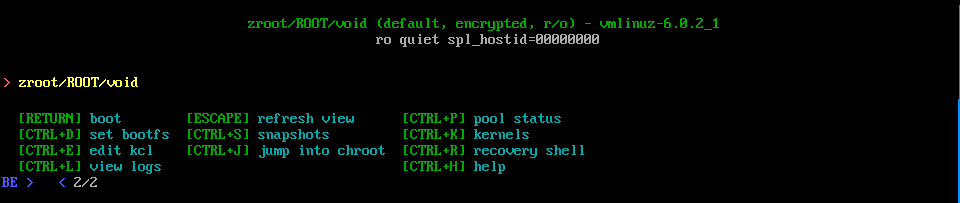
If you press CRTL+s ZFSBootMenu will list any snapshots you have taken, and you can choose such a snapshot, give it a name, and then turn that into a boot environment to boot from.
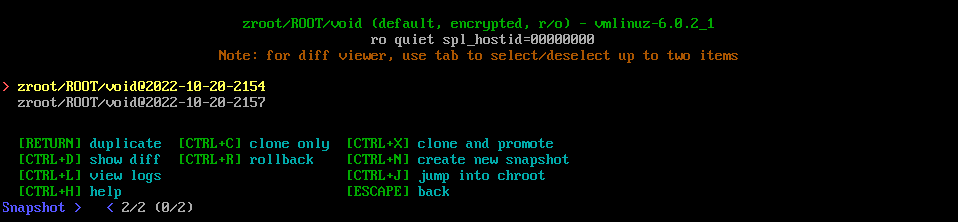
In this case I choose the zroot/ROOT/void@2022-10-20-2154 snapshot and give it a name.
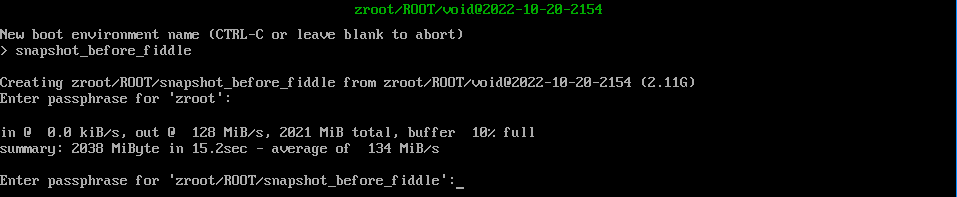
Now I have two boot environments to boot from.

If you don't know anything about ZFS snapshots, I recommend the following reading:
- Basics of ZFS Snapshot Management
- Oracle Solaris Administration: Overview of ZFS Snapshots
- Ubuntu tutorials: Using ZFS Snapshots and Clones
- ZFS boot environments
You can also setup automatic snapshots, but this is out of the scope of this tutorial.
Replacing a broken disk
Besides from the benefit of ZFS being able to not only detect file corruption but also auto repair such corruption (because we run a ZFS mirror in which case there will always be two copies of the same file), we also have the benefit of surviving a hard drive break down without any data loss.
In this section of the tutorial I am going to simulate a complete drive failure on one of the disks by physically removing the drive from the computer.
I have shutdown the computer and removed one of the drives, turned the computer back on and booted from the remaining working drive (you can do this with any one of the drives).
ZFS reveals that we're in trouble.
# zpool status
  pool: zroot
 state: DEGRADED
status: One or more devices could not be used because the label is missing or
        invalid.  Sufficient replicas exist for the pool to continue
        functioning in a degraded state.
action: Replace the device using 'zpool replace'.
   see: https://openzfs.github.io/openzfs-docs/msg/ZFS-8000-4J
config:

        NAME                                STATE     READ WRITE CKSUM
        zroot                               DEGRADED     0     0     0
          mirror-0                          DEGRADED     0     0     0
            ata-ST3500413AS_Z2AN282G-part2  ONLINE       0     0     0
            16967787449360295792            UNAVAIL      0     0     0  was /dev/disk/by-id/ata-ST3500418AS_9VMT3B5Q-part2

errors: No known data errors
I am now going to shutdown the computer again and replace the "broken" drive with a new and completely different drive (of the same size) and boot the machine up.
Let's take a look at the new drive:
# fdisk -l
Disk /dev/sda: 465.76 GiB, 500107862016 bytes, 976773168 sectors
Disk model: SAMSUNG HD501LJ
Units: sectors of 1 * 512 = 512 bytes
Sector size (logical/physical): 512 bytes / 512 bytes
I/O size (minimum/optimal): 512 bytes / 512 bytes
Disklabel type: gpt
Disk identifier: 2334B6FF-3AFB-9342-978C-A876AAA03031
We can now use the sfdisk command (notice the "s" in front) to make a backup of the disk partition scheme from the working ZFS disk (sdb in this case) and use this on this new Samsung disk (sda).
Let's backup the partition scheme:
# sfdisk -d /dev/sdb > /tmp/sdb-partition-backup.txt
We can take a look at the backup file as it's just a regular text file:
# cat /tmp/sdb-partition-backup.txt
label: dos
label-id: 0x4f376e27
device: /dev/sdb
unit: sectors
sector-size: 512

/dev/sdb1 : start=        2048, size=     1048576, type=83, bootable
/dev/sdb2 : start=     1050624, size=   975722544, type=bf
Then we'll use that to setup the new sda disk partition scheme:
# sfdisk /dev/sda < /tmp/sdb-partition-backup.txt
Checking that no-one is using this disk right now ... OK

Disk /dev/sda: 465.76 GiB, 500107862016 bytes, 976773168 sectors
Disk model: SAMSUNG HD501LJ
Units: sectors of 1 * 512 = 512 bytes
Sector size (logical/physical): 512 bytes / 512 bytes
I/O size (minimum/optimal): 512 bytes / 512 bytes
Disklabel type: gpt
Disk identifier: 2334B6FF-3AFB-9342-978C-A876AAA03031

Old situation:

>>> Script header accepted.
>>> Script header accepted.
>>> Script header accepted.
>>> Script header accepted.
>>> Script header accepted.
>>> Created a new DOS disklabel with disk identifier 0x4f376e27.
/dev/sda1: Created a new partition 1 of type 'Linux' and of size 512 MiB.
Partition #1 contains a zfs_member signature.
/dev/sda2: Created a new partition 2 of type 'Solaris' and of size 465.3 GiB.
/dev/sda3: Done.

New situation:
Disklabel type: dos
Disk identifier: 0x4f376e27

Device     Boot   Start       End   Sectors   Size Id Type
/dev/sda1  *       2048   1050623   1048576   512M 83 Linux
/dev/sda2       1050624 976773167 975722544 465.3G bf Solaris

The partition table has been altered.
Calling ioctl() to re-read partition table.
Syncing disks.
Then we'll use dd to clone the boot partition from the old working disk to the new disk:
# dd if=/dev/sdb1 of=/dev/sda1 bs=1M
512+0 records in
512+0 records out
536870912 bytes (537 MB, 512 MiB) copied, 12.6898 s, 42.3 MB/s
And we'll install the syslinux MBR data unto the new drive:
# dd bs=440 count=1 conv=notrunc if=/usr/lib/syslinux/mbr.bin of=/dev/sda
1+0 records in
1+0 records out
440 bytes copied, 0.0822139 s, 5.4 kB/s
We need to get the ID of the new drive so we can use that in the replacement command for ZFS:
# ls -l /dev/disk/by-id/
ata-SAMSUNG_HD501LJ_S10NJ1MP402489 -> ../../sda
ata-SAMSUNG_HD501LJ_S10NJ1MP402489-part1 -> ../../sda1
ata-SAMSUNG_HD501LJ_S10NJ1MP402489-part2 -> ../../sda2
Then we replace the old broken disk in the ZFS pool with the new working one and let ZFS resilver the disk:
# zpool replace zroot ata-ST3500418AS_9VMT3B5Q-part2 ata-SAMSUNG_HD501LJ_S10NJ1MP402489-part2
Let's check the status (ZFS is resilvering):
# zpool status
  pool: zroot
 state: DEGRADED
status: One or more devices is currently being resilvered.  The pool will
        continue to function, possibly in a degraded state.
action: Wait for the resilver to complete.
  scan: resilver in progress since Sat Oct 22 16:46:06 2022
        3.70G scanned at 135M/s, 914M issued at 32.6M/s, 3.70G total
        982M resilvered, 24.14% done, 00:01:27 to go
config:

        NAME                                            STATE     READ WRITE CKSUM
        zroot                                           DEGRADED     0     0     0
          mirror-0                                      DEGRADED     0     0     0
            ata-ST3500413AS_Z2AN282G-part2              ONLINE       0     0     0
            replacing-1                                 DEGRADED     0     0     0
              16967787449360295792                      UNAVAIL      0     0     0  was /dev/disk/by-id/ata-ST3500418AS_9VMT3B5Q-part2
              ata-SAMSUNG_HD501LJ_S10NJ1MP402489-part2  ONLINE       0     0     0  (resilvering)

errors: No known data errors
And after a little time, the pool is restored and we're back in business:
# zpool status
  pool: zroot
 state: ONLINE
  scan: resilvered 3.99G in 00:01:34 with 0 errors on Sat Oct 22 16:47:40 2022
config:

        NAME                                          STATE     READ WRITE CKSUM
        zroot                                         ONLINE       0     0     0
          mirror-0                                    ONLINE       0     0     0
            ata-ST3500413AS_Z2AN282G-part2            ONLINE       0     0     0
            ata-SAMSUNG_HD501LJ_S10NJ1MP402489-part2  ONLINE       0     0     0

errors: No known data errors
That's it for now :) Have a nice one!